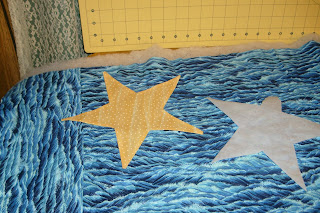
After my wonderful experience with quilting, by the way we did go out for coffee...I won 10 dollars on a scratch ticket and the two of us had a wonderful time scratching tickets and playing a few machines and having fun.
This morning I was looking over the quilt and felt the backing fabric I used was a tad bit to bold for a baby quilt, it needs some softening. Decided upon applique stars. They need to be done in the turn under fashion, only they are just a tad to big for the regular paper size and I do not have any freezer paper.
Solution: use the Wonder Under two sided interfacing I do have on hand. Then I decided I would do a sort of tutorial and share my "efforts" with all of you. So here goes.
First off is tracing the pattern onto the paper side of the interfacing. Then cut out each piece right along the drawn lines.
First piece all cut out.
Take the shape and iron it onto the wrong side of the fabric.
Now add 1/4 inch turn under allowance to the shape. I chose to use a blue pen, you can use whatever you feel comfortable with for this step....or you may be able to trim without marking (I am not comfortable enough yet to cut without a marking line.
This is what my piece looks like after cutting the seam allowance all the way around the shape.

Next step is to cut a slit at the inside point, just to the tip of the interfacing.
Now the tip of each star point needs to be ironed back, I used a pressing sheet as a boundary ....that way it will not be ironed to far back and you lesson the chance of burning fingers. DO NOT REMOVE THE INTERFACING AT THIS POINT.
This is a picture of it after the piece has been ironed back.
I then laid the pressing sheet over the entire star piece and pressed for a few seconds to help the edges lay flat.
I then removed the interfacing from the fabric............and VERY CAREFULLY ironed the fabric onto the fabric to make an edge.
This took me some time and can be a tad frustrating trying to keep the iron from going to far inward to the sticky interfacing (even with the pressing sheet).
But it is now ready to be ironed onto the fabric. Next step is attaching it with thread using a blind stitch or buttonhole stitch.
It was not a difficutl task but it does take time. I do not know if this method will work for all shapes as this is my first attempt. I was mainly curious to see if it would work and how well. I had fun sharing it, sorry it is so long! If you should try it or already use this method let me in on your thoughts and ideas also.
I most likely will not post anything for the next few days as hubby has the following two days off and will most likely be trying to get the computer emails in operating condition. Have a great couple of days.


Thanks for sharing. I haven't seen it done the way. I am too impatient for turning. LOL. But this looks easy.
ReplyDeleteVery interesting Brenda thanks for sharing. Do upoi think you could have just ironed it to your backing after you have the folded part turned under? Or did I miss that part of your instructions. I think your doing an awsome job with your quilting and very productive.Hugs, Marie
ReplyDeleteWhat a great tutorial. I think that even I could applique a star onto something.....LOL....Take care.
ReplyDeleteI like working with Wonder Under, your tutorial is really good.
ReplyDeletePat H.
what a great technique. I hadn't thought of doing applique like that.
ReplyDeleteLove and hugs Gina xxx